I’ve been really getting into the IndieWeb lately. I’ve always been a fan of open-source software (and textbooks!), but there are some cool new tools for reclaiming your domain and taking ownership of your social media data. One thing I’ve been using a lot lately is the Known web publishing platform. Back in February, I wrote a bit about it:
Known is a blog-like, social-media-like platform designed with POSSE in mind: Publish on your Own Site and Syndicate Elsewhere — a growing trend on the IndieWeb. Known double-publishes on Tiwtter (and other platforms) and uses webmentions to collect the ensuing conversations onto the original Known site. (Bridgy helps, too.) It also differentiates Tweet-like status updates from Facebook-like mini-blog entires without imposing character limits. It also integrades with social media conversations and @-replies pretty well. In short, it’s a pretty smooth way to own and control your content while connecting on proprietary social media networks.
Anyone can set up a Known blog for free at withknown.com, but it has a limited feature set. For the full-featured “Known Pro,” you either have to pay for a pro account or download the open-source software for free and install it on your server.
In the past few months, I’ve installed and maintain several Known sites: my POSSE site, a class blog, a freelance writing portfolio (which I’m having a hard time keeping up-to-date!), and a collaborative research blog. Every time I install Known, though, I miss a step — or I find something that I wish where in their documentation. So I thought that while I put together a community blog for my upcoming course on The Flipped Classroom, I’d write up the steps that I go through in installing a Known site.
Initial setup
In its current version, Known has to be installed on a root domain (example.com) or a subdomain (known.example.com), not in a folder (example.com/known). A subdomain is the most common setup (and what I’ve done every time), so the following instructions will assume an installation in a subdomain.
Subdomain setup
Login to your web host or registrar — wherever you setup your Domain Name Servers (DNS) — and create an A record that points the subdomain you want to your server’s IP address. (Here are Digital Ocean’s detailed instructions for setting up subdomains using their DNS tool. Every web host uses a different interface, but the technical details are the same.)
In Blue Host (Digital Pedagogy Lab’s web host), the DNS manager looks like this:
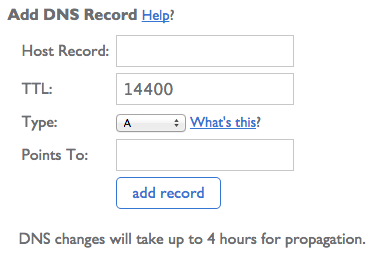
I enter “flipclass” for the Host Record, and my server’s IP address for “Points to” and then click “add record”. Note that while it says it will take up to four hours for propagation, a new subdomain should be ready to go in a matter of seconds, if the root domain is already active.
The new subdomain should now show up in the ZONE file or the subdomain list.

You can also open a terminal and ping the server to make sure it’s working properly.
ping flipclass.digitalpedagogylab.com
Prepping the server
This is where I always get mixed up.
The next step is setting up the server itself. I run a Debian Linux virtual private server with Apache 2. The following instructions should work for any Debian-based Linux setup, like Ubuntu — in fact, I figured out the steps I need to take from Digital Ocean’s Ubuntu tutorial.
First, if you don’t have the Apache server application installed, you need to do so. Login to your server in a terminal via SSH, and enter:
sudo apt-get install apache2
Once Apache is up and running, make a directory in which to install Known. It’s best to keep this with other websites and away from any user data that may be frequently changed or deleted. Since I have root access, I use /var/www, but you can also run it from a user folder.
sudo mkdir -p /var/www/flipclass.digitalpedagogylab.com/public_html
(Note that you should replace flipclass.digitalpedagogylab.com with your site’s URL.)
Now we need to set permissions. This is where I’ve found I need to break from Digital Ocean’s instructions in order to get Known to work properly. When setting permissions, I grant my user ownership (for security reasons, I’ll use “myuser” as my fake user name in this tutorial), but I give the directory to the www-data group. This allows the app itself to make changes on the fly.
sudo chown -R myuser:www-data /var/www/flipclass.digitalpedagogylab.com/public_html
Then make sure that everyone can read the files (in order to see the website).
sudo chmod -R 755 /var/www
Now create a test page to make sure it’s working.
sudo touch /var/www/flipclass.digitalpedagogylab.com/public_html/index.html
sudo vi /var/www/flipclass.digitalpedagogylab.com/public_html/index.html
(You can use nano or any other command-line text editor you have installed.)
Then put the following content into that index.html file:
<html>
  <head><title>Test</title></head>
  <body>Yay!</body>
</html>
Before we can see that test file, though, we need to get Apache running. Otherwise, visiting the site will return an error, or if Apache is running, it will point to the root website on that server (which in my case is www.shaffermusic.com, not even associated with Digital Pedagogy Lab!).
Configuring Apache
Begin by creating an Apache configuration file for the new site.
sudo cp /etc/apache2/sites-available/default /etc/apache2/sites-available/flipclass.digitalpedagogylab.com
sudo vi /etc/apache2/sites-available/flipclass.digitalpedagogylab.com
This will open the site’s configuration file. (Again, you can use nano or another command-line editor if you like.) It will look something like this:
<VirtualHost *:80>
        ServerAdmin webmaster@localhost

        DocumentRoot /var/www
        <Directory />
                Options FollowSymLinks
                AllowOverride None
        </Directory>
        <Directory /var/www/>
                Options Indexes FollowSymLinks MultiViews
                AllowOverride None
                Order allow,deny
                allow from all
        </Directory>

        ScriptAlias /cgi-bin/ /usr/lib/cgi-bin/
        <Directory "/usr/lib/cgi-bin">
                AllowOverride None
                Options +ExecCGI -MultiViews +SymLinksIfOwnerMatch
                Order allow,deny
                Allow from all
        </Directory>

        ErrorLog ${APACHE_LOG_DIR}/error.log

        # Possible values include: debug, info, notice, warn, error, crit,
        # alert, emerg.
        LogLevel warn

        CustomLog ${APACHE_LOG_DIR}/access.log combined
</VirtualHost>
Make the following edits to this file and save it:
Under the ServerAdmin line, add the following:
ServerName flipclass.digitalpedagogylab.com
Next, change the DocumentRoot line:
DocumentRoot /var/www/flipclass.digitalpedagogylab.com/public_html
Finally, change all instances of
AllowOverride None
to read:
AllowOverride All
Now save and exit. (Esc followed by :x if you are using vi or vim.)
(Re)start Apache
Once the configuration file is complete and correct, add the site to Apache and restart the server application:
sudo a2ensite flipclass.digitalpedagogylab.com
sudo service apache2 restart
Apache will likely throw the following message:
apache2: Could not reliably determine the server's fully qualified domain name, using 127.0.0.1 for ServerName
That’s normal. Don’t worry about it.
Now, go to your website address, and you should see the test file created earlier:
Yay!
If so, you’re good to go!
Installing Known
First, we need to get the Known files onto the server. Go to the Open Source page on Known’s website. Do not click “Download Known”. Instead, right-click (ctrl-click on a Mac) on “Download Known” and click “Copy Link Address” (or whatever your browser calls it). Then go back to your server’s terminal and use wget and the link you just grabbed from Known’s site to copy the zip file to your server directly. (I put it in my user’s downloads folder.)
cd ~/Downloads
wget http://assets.withknown.com/releases/known-0.7.8.5.1.zip
unzip known-0.7.8.5.1.zip -d known
Now you’ll have a folder in Downloads called known, which contains the entire Known installation. Simply copy it (or move it) to the public_html folder created earlier.
cd known/
sudo cp -R ./* /var/www/flipclass.digitalpedagogylab.com/public_html/
Now set permissions on the new files:
sudo chown -R myuser:www-data /var/www/flipclass.digitalpedagogylab.com/public_html
sudo chmod -R 755 /var/www
sudo chmod -R 775 /var/www/flipclass.digitalpedagogylab.com/public_html/Uploads
And remove the test index.html file from earlier:
sudo rm /var/www/flipclass.digitalpedagogylab.com/public_html/index.html
And take Known’s sample .htaccess file and make it into a real .htaccess file.
sudo mv /var/www/flipclass.digitalpedagogylab.com/public_html/htaccess.dist /var/www/flipclass.digitalpedagogylab.com/public_html/.htaccess
Now we can use Known’s automatic installer. Simply point your browser to the website — in this case flipcamp.digitalpedagogylab.com. Known will let you know if any prerequisite setup is necessary. Take care of that before proceeding. (My first time, there were a couple things that needed installing before I could continue, but now I’m good to go.)
On the next page, provide a name for the site in the blank provided. But before going onto the MySQL settings, you need to setup MySQL.
Install MySQL and set up an account, if you haven’t already. Then do the following to setup a Known database.
Login to mySQL.
mysql -u root -p
Create a database.
CREATE DATABASE flipclass;
Create a database user and grant it privileges (choose a better password than “password”).
CREATE USER 'myuser'@'localhost' IDENTIFIED BY 'password';
GRANT ALL PRIVILEGES ON flipclass.* TO 'myuser'@'localhost';
FLUSH PRIVILEGES;
exit;
For more details on MySQL users, see this Digital Ocean tutorial.
Now add the database settings you just created into the Known setup page. Then click “Onwards!”
You may receive an error — you should receive an error — if your server is setup securely. Known will be unable to write these settings to a new file, and you need to do it manually.
sudo touch /var/www/flipclass.digitalpedagogylab.com/public_html/config.ini
sudo vi /var/www/flipclass.digitalpedagogylab.com/public_html/config.ini
Paste the info Known provided into the file, then save and exit.
Then reload the Known setup page.
If all was successful, you should be good to go!
Configure Known
Known will prompt you to create an adminstrator user. Once you’ve done so, you can start to configure your site’s visual layout and functionality, and start posting content!
I highly recommend connecting Known with Brid.gy, in order to sync with social media services. You will also need to setup an email connection so that Known can forward notifications. Finally, I recommend the Cherwell theme, since it allows you to include a nice background image.
To cross-post to Facebook, Twitter, Flickr, etc., you can either setup Convoy (a paid service that can be configured within Known), or download the plugins you want from GitHub and install them locally. To do so, use wget to download the zip file from GitHub to the server and unzip it (same as with Known itself). Then copy the files into the IdnoPlugins folder in your Known installation, and update the permissions if necessary (see instructions above). Then you can activate then from the Plugins menu within Known.
I hope this tutorial was helpful! At the very least, I now have detailed notes in a single place for the next time I setup a new site!