This week, I helped the folks at Hybrid Pedagogy publish an ebook on open online learning. Like Engaging Students: Essays in Music Pedagogy, and all of my course websites, we published it using GitHub’s free web hosting option. I’ve written about why one might want to use GitHub for a project like this before, so this post will not explain why. Instead, I’d like to explain how for all those interested in this process, particularly those who want to pursue open-access or open-source academic publishing.
Setting up a blank ebook
Since the ebooks I’ve built have essentially been websites, any host, platform, or design is fine. However, GitHub allows any public project—including websites—to be “forked,” or copied for remixing and republishing. The easiest way to publish an ebook, then, is to fork an existing ebook and replace the content. I have a template anyone can copy (source | site), or you can fork Engaging Students (source | site) or the HP project, Learner Experiences (source | site).
Google Drive
The content for both the FlipCamp and HP projects began with Google Docs. These are easy to produce, and they involve as much new technology as I am comfortable asking most people to wrestle with when submitting something to a publishing project. HP asks authors to compose articles in Google Docs and submit by sharing them with the editors; we used the same process for Engaging Students. Learner Experiences involved student essays which were uploaded to GDocs for the editing and publishing process.
Exporting Google Docs for GitHub
Of course, GitHub will not simply publish Google Docs. GitHub can publish HTML pages, or it can use the open-source application Jekyll to convert any MarkDown or Textile files to HTML for web publication. And if you want to publish the ebook in ePub, Kindle, or PDF format, MarkDown is helpful there as well. So we want each article in a MarkDown file.
Google Docs does not support MarkDown. However, Google Docs can be exported in a number of file formats, which can in turn be converted to something GitHub can deal with. Each brings its own problematic aspect to that process, but I’ve found one almost ideal solution.
First, we exported all the Google Docs as HTML files.
Next, we converted those files to MarkDown, using the following code for each file (you may need to download and install Pandoc):
pandoc -f html -t markdown --no-wrap -o FILENAME.md FILENAME.html
Because of Google’s weird stylesheet, some formatting will be lost and will have to be re-added manually: bold, italics, headings, etc. Likewise, if you plan on using LaTeX to make a PDF, you will have to replace some Unicode characters (smart quotes, em dashes, etc.) with regular characters. However, this is a pretty quick process, especially compared to what you have to reconstruct if you export the Google Docs as MS Word files.
The only thing these documents are Missing are the headers that GitHub is expecting in order to build the website. Simply use the headers in the markdown files for the ebook you forked, replacing author and title information. Watch out for colons, though! These headers (called YAML headers) don’t play nice with colons in titles. Use HTML code instead. (See example.)
Building the site
Once you have forked an existing ebook and have each article/chapter in MarkDown format with an appropriate header, building the site is a piece of cake. It requires a bit of technical knowledge (or learning), but if you’re editing and publishing an ebook, it’s probably worth it. (Again, I’ve never had submitters dig into this, only editors.)
First, if you haven’t already, install git. You may also want to install Jekyll to preview the site you create locally as you’re working on it, but you don’t have to. GitHub has Jekyll running, and it will automatically generate your site when you upload source files.
On the GitHub website, open the page for the project source—this is the github.com/user/project site, not the user.github.io/project (or fancy, paid URL) for the actual site. For example, github.com/kshaffer/GHbook. You’ll see something (probably off to the right) like this:
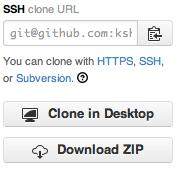
Click on the clipboard icon to copy the clone URL to your clipboard.
Open a terminal and navigate to a place where you would like to download the ebook locally. Then type
git clone whateverYouJustCopiedToYourClipboard
For example:
git clone git@github.com:kshaffer/GHbook.git
You now have the entire ebook website code on your computer. If you cloned my ebook you’re good. If you cloned something else, make sure you’re on the right “branch” before doing anything else. Use the “cd” command to move into the downloaded project folder, for example:
cd GHbook
Then check to see if you are on the gh-pages branch of the project (the one that publishes the website):
git branch
If it says gh-pages anywhere with an asterisk, you’re good. If it says gh-pages somewhere, but the asterisk is by something else (like master), type the following:
git checkout gh-pages
If gh-pages is not listed, create it by typing:
git branch gh-pages
git checkout gh-pages
Once you’re into the gh-pages branch, open it in your file manager (Finder, Explorer, whatever). Now copy all of your MarkDown files (with proper headers) into this folder, and delete the existing markdown files, with the exeption of index.md. If you have supporting images from the Google Docs, copy them in as well. Your content is now part of the book!
Now open the index.md file and edit the front page. For example, if you want to include a table of contents right on the landing page, enter it here. Each link should be proper MarkDown:
[text people see](filename.html)
For example:
[Chapter 1: Introduction to GitHub Pages.](chapter1.html)
Keep in mind that though all the source files are markdown files (*.md), Jekyll will produce a new batch of HTML files, so the link should point to an HTML file (*.html) with the same root name.
Once your front page is set and your chapters imported, you just need to make a couple changes to the header and footer that appear on each page. These are found in the default.html file in the _layouts folder of my template. In that file, you’ll want to change the title of the book (it appears twice), links to github repositories, licensing information, and Google Analytics code.
That’s it!
Of course, you could do more sophisticated editing, like overhauling the CSS files, incorporating Twitter Bootstrap, inserting Dicqus comments, etc. You’re on your own for that! If you want a basic, reader-centric design and an easy route to publishing, this is all you need to do.
Editing and publishing
To see how things look, you can either run Jekyll locally (if installed), or push the content to GitHub and see how it looks. To run jekyll locally, simply navigate to some folder inside this project at the terminal and type
jekyll
Then your site will be built in the _site folder. (Otherwise, simply ignore that folder.)
If you are satisfied with the way it looks (or want to push it to GitHub to find out how it looks), run the following at the terminal (inside the project directory):
git add .
git commit -am 'some message here so you can keep track of changes'
git push origin gh-pages
This pushes all your changes to GitHub. They should show up in your project source directory. Now you can check to see if the project built the website successfully. Go to the project source page and click on “settings” to find the URL. Go to that URL to see if your ebook successfully built. If not, wait 5–10 minutes and try again; sometimes the first build is slow. If it still doesn’t load, make sure you have validated your email address with your GitHub account. If that doesn’t work either, you have some sleuthing to do. However, if you have a relatively straightforward project and have followed the instructions above, there should at least be something that is just in need of some tweaking.
Assuming there are some changes needed, simply make them on your computer, and then repeat the above procedure to push the changes to GitHub.
git add .
git commit -am 'some message here so you can keep track of changes'
git push origin gh-pages
I’ve found that the changes are published almost immediately, but I have to clear my browser cache to see them if I’ve been to the site recently enough.
Editing as a team
Every GitHub project includes an “issues” page: github.com/user/project/issues. Here, a team of collaborators can create a to-do list of editing tasks, assign them to specific editors, and even collect them together into “milestones” with deadlines. For Learner Experiences, we used milestones like all content initially imported, ready for final review, and ready for publication. This is a great tool for team-based editing and site-building, but not so much for communicating specific edits to authors. (That’s much better in GDocs.)
Other formats
MarkDown is a great source format, because it is so flexible. In addition to GitHub web pages, it can be the source for a PDF book created with LaTeX, an ePub file for importing onto non-Kindle eReaders, or a mobi file for importing onto Kindle eReaders.
To create an ePub, create a new folder for your ePub files and follow the instructions here to create metadata and title-page files (very simple). Then copy all of your content MarkDown files into that folder. In each file, remove the YAML header and reaplce with a title heading and an author byline. For example, replace
---
layout: post
title: How do learners experience open online learning?
author: George Veletsianos, PhD
---
with
# How do learners experience open online learning? #
**George Veletsianos, PhD**
See an example set of files here.
Then run the following Pandoc command at the terminal:
pandoc -S --epub-metadata=metadata.xml -o FILENAME.epub title.txt chapter1.md chapter2.md chapter3.md
Be sure to list all chapter files and any front/backmatter files. In just a few seconds, you will have an ebook for use on a Nook, Android, or iOS device.
To create a Kindle book, simply download kindlegen from Amazon and follow the straightforward instructions to create a Kindle ebook from that ePub.
To create a PDF with LaTeX, make a new MarkDown file with a proper LaTeX/MarkDown header, such as the following:
latex input:		mmd-article-header
Title:				Learner Experiences with MOOCs and Open Online Learning
Author:				ed., George Veletsianos
Date:
Base Header Level:	2
latex mode:			memoir
latex input:		mmd-article-begin-doc
latex footer:		mmd-memoir-footer
Then copy all of the content files into that single new file, and replace the YAML headers with chapter-title headings and an author’s byline. (Or, simply copy all the content from the ePub source files, where you already replaced the headers.) Then you have to use multimarkdown with LaTeX to produce the PDF. Details are included on the multimarkdown site, but I have a helper script that I use. I know it should be a shell script, but I’m better at Python, so that’s what I have! It should be good for any Mac OS/Linux distribution, provided you’ve got a working installation of LaTeX and multimarkdown (both free and open source).
#!/path/to/python

import sys
import os

mdFileName = sys.argv[1]
texFileName = os.path.splitext(mdFileName)[0] + '.tex'
pdfFileName = os.path.splitext(mdFileName)[0] + '.pdf'
rootFile = os.path.splitext(mdFileName)[0]

os.system('multimarkdown -t latex ' + mdFileName + ' > ' + texFileName)
os.system('latexmk -f ' + texFileName)
os.system('pdflatex ' + texFileName)
os.system('latexmk -c ' + texFileName)
os.system('open ' + pdfFileName)
os.system('rm ' + rootFile + '.ist')
os.system('rm ' + rootFile + '.glo')
os.system('rm ' + rootFile + '.tex')
os.system('rm ' + rootFile + '.dvi')
Concluding thoughts
That may not seem simple! However, if all you want is a web-readable ebook, it really is. You can avoid the hassle of designing the look and finding a host, and skip all of the ePub/Kindle/LaTeX stuff. A motivated editor can learn the necessary tools to build an HTML-based GitHub ebook in a few hours, perhaps less if she already knows something about HTML or MarkDown, and convert/build a book of 10-ish essays in less than a day. It gets even faster when you do it a second time, especially if you reuse an existing theme. And if you already have the requisite software installed, the entire process outlined here can be accomplished in a day or two by a single person, faster with a team.
And just like any other webhost, fancy things like analytics and masked URL forwarders can be used. You can host the ebook for free and direct people to it with a slick URL for about $10/year. Alternatively, a custom bit.ly link, such as http://bit.ly/MyEBook, can provide a memorable (though perhaps not permanent) URL for free.
I hope this guide is helpful for many who want to pursue open-licensed publishing. Feel free to comment below or tweet me with questions.